
How to Connect a New Printer to Mac?
September 25, 2023

Several printer brands and models are available for printing, scanning, and copying operations. Some of the famous printer brands include HP, Samsung, Xerox, Brother, Epson and Canon. But, if you want to print from a Mac computer, you must connect the printer to a device. Fortunately, this post will cover some easy ways to connect the printer. Since the process depends on the type of printer you’re using, follow them with caution. Otherwise, you will run into an interrupted connection process.
Therefore, read it and learn how to connect a new printer smoothly. It will teach you easy methods to connect the printer to a Mac computer via Wi-Fi, USB, Bluetooth, and IP address. But first, let’s start with the method to connect an AirPrint printer to a Mac computer.
Method 1: Connect an AirPrint Printer to Your Mac
If you have a new AirPrint printer, you can easily connect it to a Mac. Follow these step-by-step instructions to connect the printer to a Wi-Fi network.
- Firstly, confirm that your Mac computer is connected to a Wi-Fi network.
- Next, you have to connect your printer to Wi-Fi.
- After that, use Command + P or select File > Print.
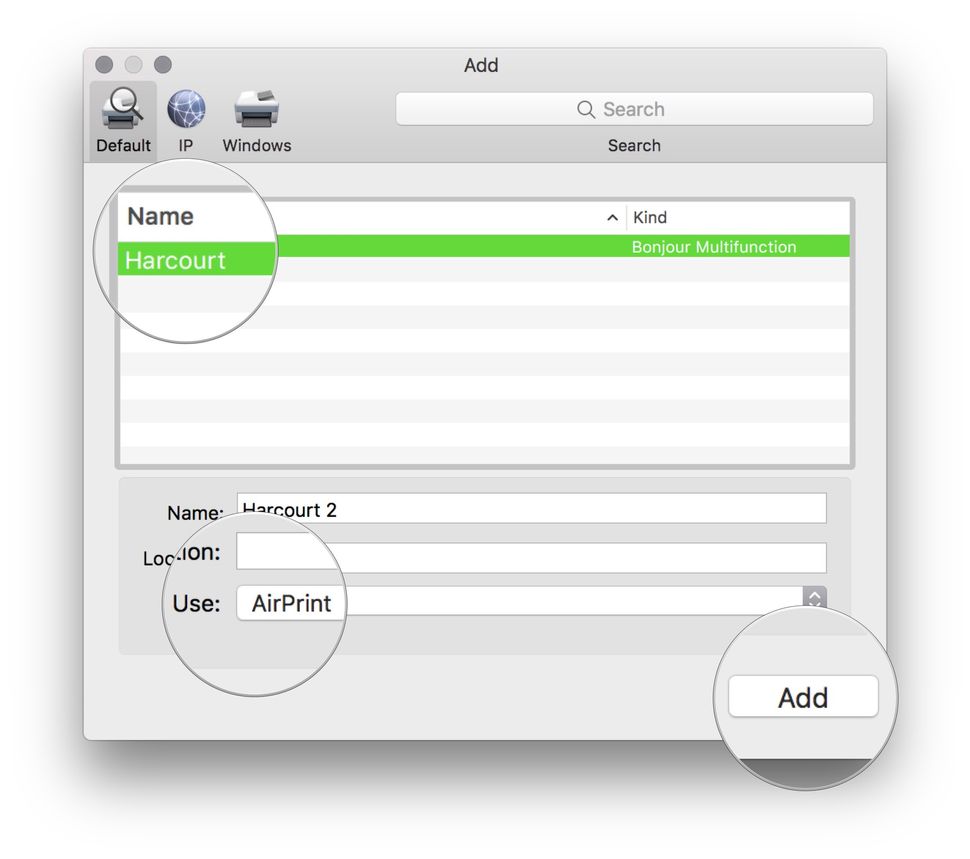
- Now, discover the printer dropdown from the Print menu dialog.
- If you find your printer, you’re ready to go for printing.
- If you can’t find your printer’s name, tap on the dropdown menu.
- In the following step, look for your printer.
- Next, you can tap on the Add Printer.
- When a menu appears, discover your printer’s name and choose it.
- Afterward, ensure that the Use dropdown menu is set to AirPrint.
- Finally, click on Add to add the printer.
Method 2: Connect a Wireless Printer to Your Mac via WPS
Do you have a printer with a WPS button? You can use this button to connect your printer device via WPS. After setting up the WPS, you can follow the below-mentioned steps.
- First, move to the top-left of your Mac screen and click on the Apple icon.
- Now, head to the System Preferences option.
- Then, tap on Add Printer, Scanner, or Fax. You can find the Print & Scan option under the Hardware section if you have an old Mac computer.

- Thereafter, tap on the + sign below the printers’ list.
- At last, click on the printer you want to add. The Mac system shows all the discoverable printers.
Did you successfully connect the printer? If not, hit the link connectnewprinter.com and communicate with a certified printer expert via call or chat to get a free consultation.
Method 3: Connect a Network Printer With an IP Address
The next option is to connect a new printer via an IP address. Apart from being a convenient process, it is considered a good backup option if your system fails to discover the printer for some reason.
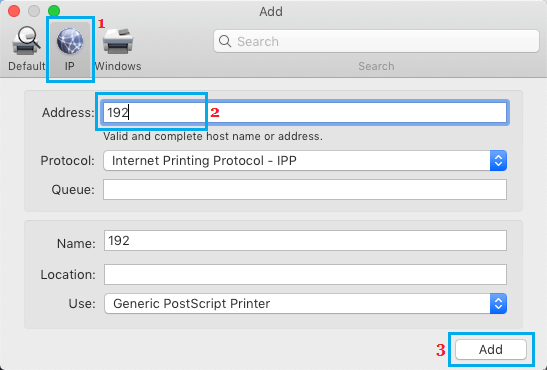
- Initially, find the IP address for your printer. You can browse through the menu to get it.
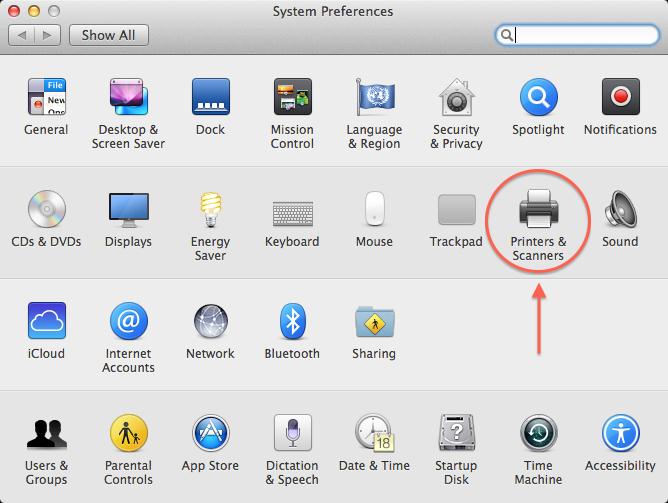
- Now, move to the Printers & Scanners option.
- After that, tap on the + sign and add your new printer.
- Then, move to the top of the window and tap on the Globe icon.
- Next, type in your IP address with an Address option.
-
Lastly, tap on the Add button.
Connecting a new printer to your Mac device is one of the most convenient options. However, if you want to establish the connection via other methods, read them below.
Method 4: Connect a USB Printer to Your Mac
Mac users can follow these basic step-by-step instructions to connect their USB printers. These are easy to execute, and thus anyone can follow them.
- First, click on the Power button to start the printing device.
- Now, use your USB to add the printer to your Mac.
- After that, add your printer using the below steps.
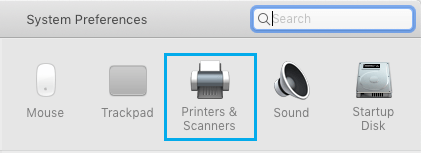
- Tap on the Apple icon and head to System Preferences.
- Afterward, hit on Printers & Scanners from the next screen.
-
Then, hit the + icon to launch the Add Printer dialogue box.
![]()
- Now, ensure you are on the Default tab.
- Subsequently, select the printer you want to add to your device.
- At last, tap on the Add button.
These are easy steps to connect a USB printer to a Mac device.
Method 5: Connect a Bluetooth Printer to Your Mac
Those with a Bluetooth-enabled printer can conveniently pair it with their Mac computers. The process of pairing is as easy as pairing wireless headphones. But before pairing, you must add the device to the printer list. Here are the steps you can execute.
- Initially, confirm that your Mac is using the updated macOS version.
- Now, you need to turn on your printer.
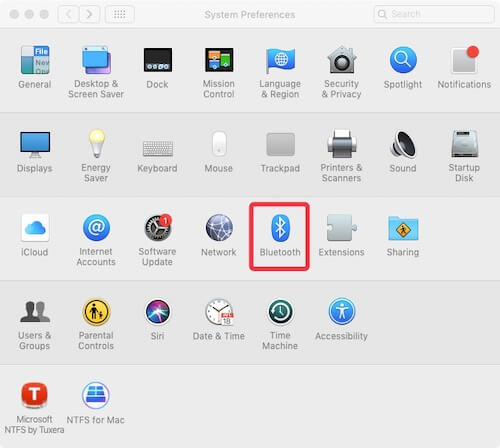
- After that, open System Preferences.
-
Next, go to Printers & Scanners.
- Then, hit on the + sign and select your device from the list > Add.
- Thereafter, click on the Bluetooth icon on your Mac.
-
In the end, go to Bluetooth Preferences and pair your printing device.
Therefore, you have learned the different ways to connect a new printer of different types. However, if some errors occur in the middle, visit connectnewprinter.com and seek valuable assistance from experts. They are available 24/7 to provide free consultation for printer concerns.
Conclusion
Printing from a Mac is an easy process. But, before proceeding, you first need to connect a new printer to a Mac device. However, the connection process can vary depending on the printer you have. Whether you have a wireless, network, or Bluetooth printer, you can connect it effortlessly with easy-to-follow steps. Besides, remember to download and install the latest printer driver if it’s corrupted or outdated.
Frequently Asked Questions
Question
How Do I Add a Printer With a USB Cable on My Mac?
If your printer can’t connect to a Wi-Fi network, you can opt for a USB cable. For this, you can implement these quick steps.
Begin by using a USB cable to connect the printer and your Mac.
Now, you can see the list of available printers.
Or, you can see the prompt to install the latest printer software.
In the end, hit on Install and complete the installation procedure.
Question
How to Connect a Mac Computer to a Bluetooth Printer?
The Bluetooth connectivity allows hassle-free printing without wireless. Are you planning to print from a Mac via a Bluetooth-enabled printer? Below, we’ll show you the connection steps to connect the printer via Bluetooth.
First, click on the Apple icon.
Now, head to the System Preferences.
Then, go to Printers & Scanners.
After that, tap on the + sign and choose your printer.
Finally, tap on Add.
Question
How Can I Connect a New Printer Using its IP Address?
You can find the IP address and follow these convenient steps to connect your printer. It is hassle-free and time-saving.
First, hit on the Apple logo and go to System Preferences.
Now, choose the Printers and Scanners button.
After that, choose the web icon below the Add Printer option.
Now, include your printer’s IP.
Afterward, choose the protocol, i.e., AirPrint, LPD, IPP.
Then, enter the Name and Location.
Now, download the latest printer’s software.
Finally, click on Add.
Enter your Comments Here: